
In the second of our tips, brought to you by Jail Recordings, we're looking at flex editing again. This time we'll share a tip on working with recorded audio with to tempo reference.
Logic 9 uses a combination of transients and embedded tempo information in audio files to quantize audio. When you record audio in a Logic project, the project tempo setting is used. If you record without reference to the project tempo, or if you import audio that was recorded with another application, then Logic will likely not have the correct reference points to properly perform quantization, and thus will not be ready for Flex editing.
Here are several workflows to embed the correct tempo information into an audio file to prepare for Flex editing. Choose one, depending on your situation:
If the underlying tempo of the recorded audio is steady, and is close to the tempo of the project
- Enable Flex mode.
- Grab the upper-right side of the region and drag it right or left to match the tempo of the audio to the project tempo.
If the underlying tempo of the recorded audio is steady, but is not close to the tempo of the project
- Highlight the audio region in the Arrange window.
- Go to the local Audio menu in the Arrange window and choose Detect Tempo.

- Logic will analyze the audio file. If the resulting tempo is good, click OK.
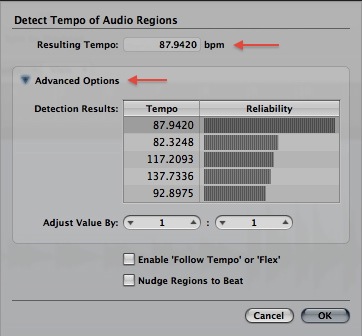
- If the resulting tempo is not what you expect, click the disclosure triangle for Advanced options, and choose one of the alternate tempos in Detection Results. Click OK.
If the underlying tempo of the recorded audio varies
- Create a new Logic project.
- Import the audio file into the project, and put it onto a track in the Arrange window.
- Adjust the left region boundary to remove any silence from the beginning of the region, and move the region so it starts at position 1 1 1 1.
- With the audio file highlighted, choose Options > Tempo > Remove Tempo Information from Audio File.

- Go to the local View menu in the Arrange window and choose Configure Global Tracks.
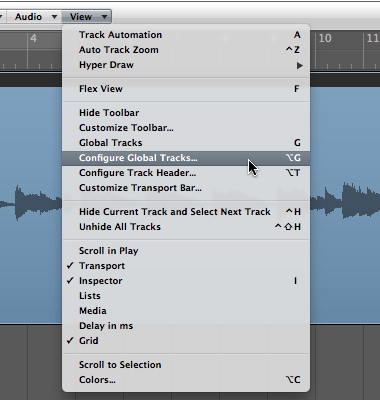
- Select the option for Beat Mapping if it is not already selected then click Done.

- In the upper-left corner of the track list, click the Global Tracks disclosure triangle.

- Click the Beat Mapping disclosure triangle in the Global Tracks header.

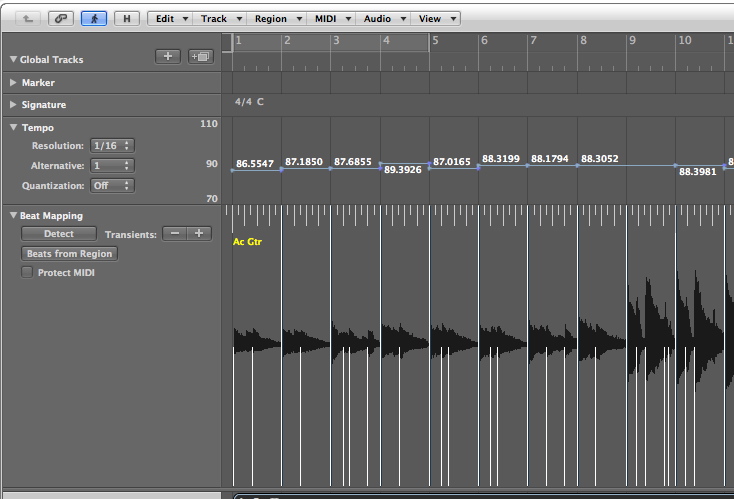
- Click the Detect button in the Beat Mapping header.

The audio file will be analyzed for transients, which will appear in the Beat Mapping track as vertical white lines.
- Use the Transients "+" or "-" buttons in the Beat Mapping track header to increase or decrease the number of detected transients as needed.
- To start beat mapping, grab a point on the beat grid along the top of the Beat Mapping track and drag it to the transient in the audio file that corresponds to the beat number. In the example below, the third transient in the audio file should fall on beat 2, so we grab the grid at beat 2, and connect it to that transient.

- A new tempo is now set.

- Continue beat mapping the file, connecting beats in the grid to appropriate transients. A series of tempo changes is created.
- When you've worked through the audio file, choose Options > Tempo > Export Tempo Information to Audio File.
The file is now ready to be used with Flex editing. When you enable flex in a project, the audio file will follow the project tempo, even if the project contains tempo changes. Conversely, an audio file with a fluctuating tempo will play steadily in a project with a constant tempo.
No comments:
Post a Comment